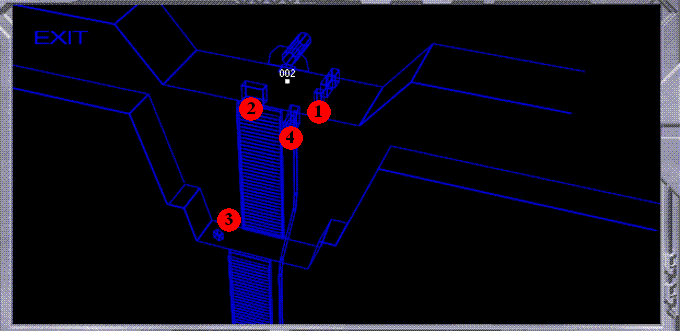
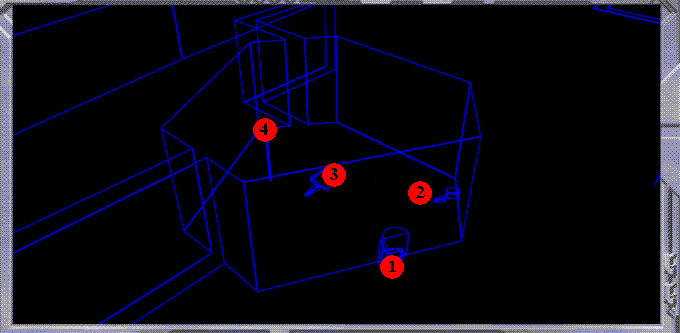
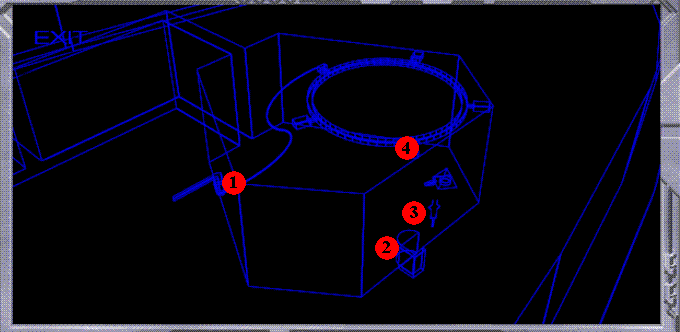
As soon as you have the arm computer you can use the map function. It will only show the areas you have already visited, to the map grows over time. The hub camp is the starting point of the game, the most southern point of the Rama cylinder. The "002" is always your position on the map. Other crew members have their own ID number, for example Francesca Sabatini has ID 006. Point (1) is the hub camp computer where you can see the crew introductions. Point (2) are the lockers. You will have to check locker 2 (your own), locker 9 (Wakefield's locker), locker 6 (Sabatini's locker, her key is at the nuclear device at point (3)) and locker 7 (Heilmann's locker, using the blank key). When all is done, go to the cable car (4) and use O'Toole's code ("4143") to descend to base camp.
Central Plains
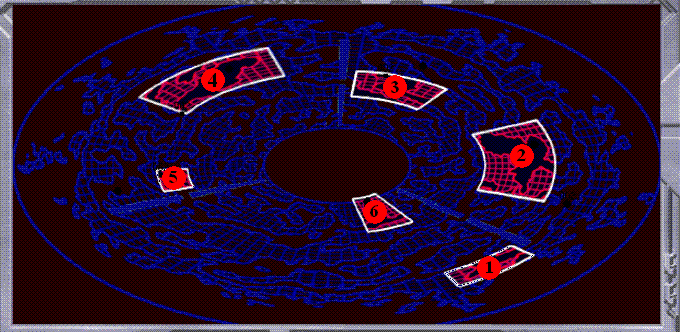
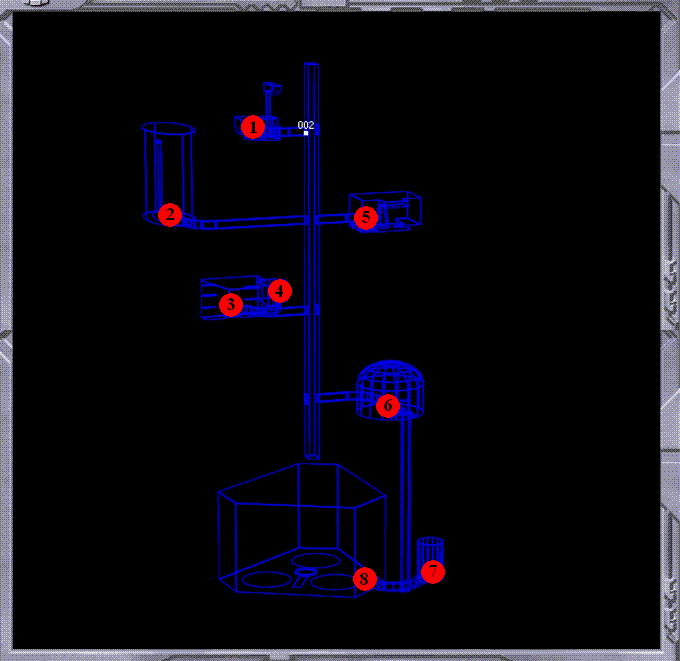
The Central Plains has its own special map, not accessed through the arm computer. The most important areas have a fixed location. These are base camp (1), the Biot garage (2), London (3), the Giant Wheel (4), Bangkok (5) and the Ice Port (6). There are however also random locations (not marked on the map below) where you can find other crew members (identified by their ID number) and biots (identified by green dots). You will have to search those as they will give information and objects. Simply hover the mouse over the map until an area highlights, click on it and look on the mini-map what is happening there before entering the area. Avoid triangular-shaped dots and cross marks as these are deadly crab biots and spider biots.
New York
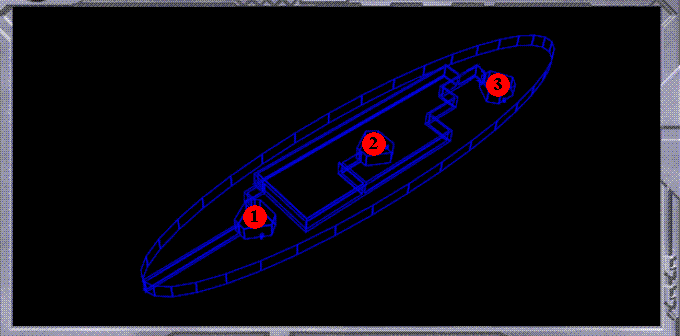
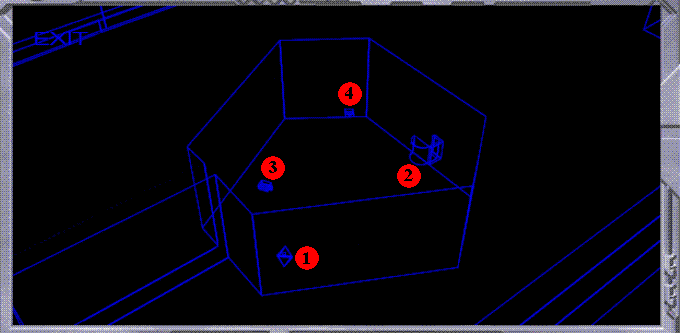
A map which is first revealed in the London building in the Central Plains, New York consists of three plaza, connected with long corridors: the Avian Plaza (1), the Octospider Plaza (2) and the Human Plaza (3). In the corridors themselves, 5 tune forks can be found, indicated by Puck. The corridors have 3 locked doors, which are opened by recording tones on the blank plaque in the Avian Plaza
Avian Plaza (point 1 on NY map)
As with the Human and Octospider Plaza, the human Plaza has a tone recording device (1). Since this is the first plaza we encounter upon entering New York, use the blank plaque on the device and record all tones (moving the shaft in all positions), so you won't need to use the other recording machines any more. You will need to use a tone fork (with four red marks) to move the white ramp (2) to the far left and to access a higher level room, containing a piston device. Use that piston device on the stair-shaped sculpture near (2) and get the avian perch. At the pyramid (3), you need to use the neck ring on the avian statue, place the perch on the steps of the pyramid and turn the handle to open it. In the pyramid itself, you need to select the Raman melon symbol to open the access to the avian shaft (4).
Avian Shaft
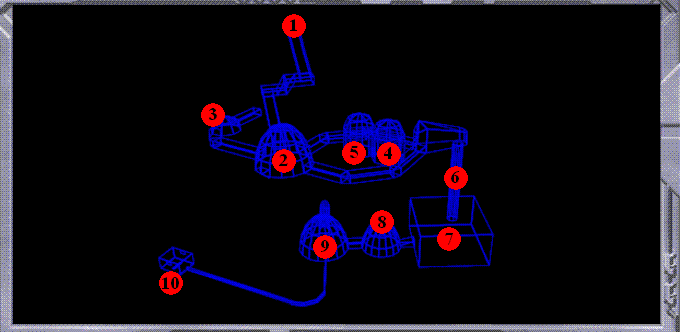
Once you enter the shaft, you can't leave until the entire Avian lair is explored and solved. You'll need to visit the avian nest (2) to obtain rama melons (allowing to shortly see clues in ultraviolet when eating them) and to get an avian hexadecimal translator (to open a door and activate an elevator). From the theater (3) you'll need an oil-filled gourd (to activate a bridge mechanism in the shaft) and from the dressing room (4) you'll need a costume pendant. In the schoolroom (6), you'll need to eat rama melons to get the code for leaving the shaft and a clue for opening the door to the nuclear device. Also make a note of the schoolroom code. In the control room (1), entered by using the avian translator, you'll need provide access to the schoolroom podium with the elevator shaft to the lower level. When you have the magnetic card you'll also have to use the elevator (using the avian translator) and enable the exit from the shaft. The hatchery contains a cable, needed to go down to the lower levels. It also contains a magnetic card, which is obtained by placing both pendants in the receptacle on the back of the purple cylinder. The lower level has a storage room (7) with a bowl and a pool room (8) which contains the other pendant.
Octospider Plaza (point 2 on NY map)
On this plaza, look around for a green-green jewel (used on the pedestal in the grotto (3)), an indigo-yellow jewel, a blue filter and Takagishi's video camera (remove and watch the data cube video on your wrest computer). As with the Avian and Human Plaza, the Octospider Plaza also has a tone recording machine (2). The grotto (3) contains a picture of O'Tool with a partial code for the bomb, a yellow-red jewel, and a prism. Other items in the grotto are useless. After having obtained the prism, use it on the door of the tetrahedron (1) where the color-matching puzzle is located. Solving this puzzle opens the entrance to the Octospiders' lair (4).
The Octospider Lair
First you'll have to go to the fountain room (3) where you find jewels and several data cubes on Sabatini's uniform. The ceiling puzzles at (2) and (8) reveal the spikes in the shaft (6). Also press the button at (8) to provide access to the octospider teacher (5). At the Octospider teacher, you will obtain a chuck of food, O'Toole's catechism card and his favorite number chart, containing hints to disarm the bomb. You will have to send Falstaff through the small transport tunnel (9) to get to the Octospider dining area (10) where he will obtain a green laser and O'Toole's ID card for you. The trophy room (4) contains a stuffed Avian and stuffed Takagishi.
Human Plaza
Look around for blue-yellow and a green-red jewel in this plaza. As with the Avian and Octospider Plaza, the human Plaza also has a tone recording machine (2). When inserting a tone fork (with one red line) into the tone fork statue (3), a Mantis Biot will appear from the nearby pyramid and open the door to the subway ring (4). After having sorted all lifeforms by size in the subway ring, and having activated the bridge mechanism, you can cross the chasm (1) towards the entrance of the room where the armed bomb is stored.