An important note on the newspapers: there are six of them to collect during the game, and in order to win you will need to find at least five. As you can figure out, you can thus afford to miss one, but not more.
LOCATION
ACTION
HOTEL ROOM
Enter the bathroom to see a Doralice nude (optional)
Try opening the briefcase - it is locked.
Leave the room three times - Doralice remembers the combination.
Open the briefcase with the combination 'AARGH'.
Get the toothbrush.
Open the drawer, get the adapter and use it on the electric outlet.
Click on the toothbrush's plug and insert it in the outlet.
Set the toothbrush to 110v and turn it on. You find the vial inside - get it.
You need to contact Jeffrey Miller to inform him. Look up the phone number of Quantum Laboratories in the directory and call - a receptionist doesn't let you through to Miller.
Go down to the lobby.
HOTEL LOBBY
Get the key-ring next to the flower vase and give it to the receptionist - you get the swimming pool key.
Get the token from the ashtray and the newspaper (1/6).
Click on the magazines and go through the pages until you see a torn corner with part of a phone number: "Lou Dale: 674-". With the magazine still opened, click on the directory on the table to find Jeffrey Miller's direct phone number. Write it down as it is a random number.
HOTEL ROOM
Use the phone and call Jeffrey Miller's direct number. He tells you to hide the
vial and gives you the access code of the Quantum buildings. Write it down!
Unplug the toothbrush, remove the adapter and plug in the refrigerator.
Open the refrigerator. Take the water jug on the table and pour water in the ice tray.
Put the vial in the ice tray.
HOTEL LOBBY
You receive a phone call from Robaire, and go to the swimming pool.
SWIMMING POOL
Talk to Prisca (on the left). She tells you a man in a wheelchair asked her about Nichols death.
Get the lamp Prisca gives you.
She also got a pendant from him that she lost.
Get the hat and give it to Prisca.
Use the switch to turn the pool lights on.
Something sparkles in the pool - get the pendant, which is a broken micro-transmitter.
Talk to Sharon (the other girl) and ask her for a cup of coffee.
Take a sugar (don't put it in the coffee).
Go to the booths and use the pool key to open the locker - you find a broken walk-man.
Use the token on it to open it, and get the battery.
Retunr to the pool and leave for Quantum Laboratories.
STREET
Go to the reception by clicking on the flag on the left.
Use the access code from Jeffrey Miller to open the door.
Q.U.L. RECEPTION
Use the button - the receptionist says Miller hasn't been in his office all day.
Try taking the storeroom key - a dog guards it. Give the sugar to the dog and get the key.
STREET
Use the phone booth, use the token in the coin slot and call Miller (make sure to dial correctly to avoid getting stuck!)
Miller tells you to enter the office and gives you another secret code (write it down!).
Go to the parking lot.
PARKING LOT
Use the storeroom key to unlock the storeroom on the right.
Use your flashlight and move the beam to the far right, just above the middle of the screen. Stop the light there, and click on the hook.
Check out the pocket of the uniform on the left. Get the cleaning lady's car key and leave the storeroom.
Optional: click a few of the cars for some joke animations.
Use the car key on the red car next to the bum - the door is jammed.
Talk to the bum. Kick the car wheel and the car will open.
Look inside the car and get the shiny access card at the bottom right.
Click on the security system above the bum, insert the access card, and insert the secret code that Miller gave.
QUANTUM OFFICE
Jeffrey Miller has been assassinated. Check the lapel of his coat to find a silk handkerchief.
Click it and you will place it on the table. Click it again to find a microcassette. Take it.
Click the very large red book at the bottom to open a liquor cabinet.
Click on the cable on the right to reveal microcassette player - Click on it to place it on the table.
Insert the microcassette into the player - it doesn't work yet.
Click on the statue's left nipple to activate the lamp and listen to the cassette.
Jeffrey Miller reveals there are three vials in total: one in your hotel room, one in possession of his son Kenneth, and one which was stolen by Peter
Hillgate, a.k.a.Doc. Doc has a secret laboratory hidden under a lingerie shop.
Optional: feel free to read all the book titles in the library.
Depart for the lingerie shop.
LINGERIE SHOP
Get the newspaper from the table (2/6).
Enter the left booth and click on the paper: an extract from an article on accidents caused by dangerous products.
Optional: click on the left side of the frame to look into a mirror and see a picture of Doralice trying clothes on, with a few
differences in each booth.
Enter the middle booth, click on the shoe box and get the stiletto heel.
Enter the right booth and click on the private door outside. When it's slightly, open, click on the bell above the door to disable it, and enter the room.
LINGERIE BACKROOM
Click the hand of the man on the pin-up poster to reveal a padlock key - take it.
Optional: click the other posters for fun.
Get the magnetic label from the shelf.
Click boxes to move them around so that the bottom left reveals a safe. Click on it.
Use the key on the padlock, use the stiletto heel on the bar, and the label on the safe to open it.
Insert 'DOC' as the code, pressing the combination dial before inserting each character.
DOC'S HIDEOUT
Press the rewind button and play button of the answering machine to listen to the messages.
Rewind again and press the erasure button.
Get the scalpel next to the answering machine.
Search the coat pocket twice to get a mask and a key.
Use the key on the closet's keyhole and check out the documents on the second shelf from the top - you find photos of a patient, signed by Lou Dale, the photographer from the hotel lobby magazine.
Check out the third shelf from the top to find a jar with two vials. Break the jar with the stiletto heel and get both vials.
Leave the laboratory.
HOTEL LOBBY
Get the newspaper (3/6).
HOTEL ROOM
Robaire is sleeping on the bed and the room has been searched.
Check the ice-trays to discover they are empty.
Check out the glass on the table - the broken vial suggests Robaire drank its content.
Get the chocolates next to the glass.
Get the label pin from the rug.
Call reception (dial 0) or just head there to meet the inspector.
HOTEL LOBBY
The inspector, Pedro di Helgos, is the man in a wheelchair Prisca was telling you about. Check out his cat (in his right hand) and talk to him.
There are two ways to pass the interrogation:
Answer 2-2-1-2-1 or
answer 2-2-2-1-2-1
Check out the white dot on the carpet to find a scrap of paper - the second part of the photographer's phone number! Write it down (so the entire number is 674-xxxx).
Show the label pin, photo and pendant to the receptionist for clues.
HOTEL ROOM
Robaire has left the room. Call Lou Dale - you get her address. Go to the photo studio.
PHOTO STUDIO
Check out the car and get the 10 dollars on the windshield.
Look at the package inside the car to see that it comes from Doc's lingerie shop.
Look at the label pin on the front seat.
Ring the studio's door bell (once! three times is game over) - nobody answers.
Go to the service door and search the waste bin to find a newspaper (4/6).
Examine the door lock to discover there is a key on the other side.
Slide the photo you took underneath the door, use the scalpel on the lock and get the photo and key.
KITCHEN
SAVE THE GAME!
Open the bottom left cupboard, containing a waste bin, and leave it open.
Open the cupboard above, click on the glasses and one of them will fall into the waste bin.
Get the bottle of bleach behind the glasses.
Open the cupboard to the right of the waste bin, get the cloth and get the bottle of lye/caustic soda.
Open the cupboard to the right of that, and place the basin on the counter.
Open the cupboard above this one and get the bottle of ammonia detergent.
Use the mask on yourself.
Turn on the faucet, and use the cloth on the water.
SAVE THE GAME! You need to act fast here.
Pour the bleach, the caustic soda and the ammonia into the basin.
Click on the upper button of the hatch to partially open it, and again to fully open it.
Click on the basin to pass it through the hatch and the lower button to close the hatch.
Place the wet cloth into the slot between the hatch and the kitchen wall.
A bit later, the gangster will be unconscious.
Lou Dale tells you she was hired to seduce Kenneth Miller so that she could take his
photo. After the job was done she continued having a secret relationship with
him, until he mysteriously disappeared. When he reappeared, he didn't seem to
know her anymore. Lou suspects the photos at Doc were taken for the purposes of a plastic surgery operation. Kenneth hangs out with a girl at the Red and Blue Club, the same club of the label pin. You get Kenneth's signet-ring and hide the vials at Lou's place.
RED AND BLUE CLUB
The bouncer won't let you in without ID.
Search the trash on the right to find another newspaper (5/6).
Show Eduardo the label pin and then 10 dollars.
When talking to Kenneth Miller, choose one of the following paths:
2-2-1-2-1 or
2-2-2-1-2-1
VILLA'S BEDROOM
Give the chocolates to Kenneth - He will fall asleep.
Examine Kenneth, check his hand and take the ring.
Examine his buttocks to discover this isn't Kenneth, but a doppelganger.
Check his pendant and use your own pendant on it.
Go to the lounge.
VILLA'S LOUNGE
Click on the parrot to make it retrieve a cigar. Take the cigar, and put it in
the pirate's mouth.
Get the landing net from the floor.
If the lights in the aquarium are off, click on the switch at the bottom to
turn them on.
Click on the shellfish on the right. Click on the plankton and use it on the shell. The shell opens. Use your net on the pearl to retrieve it.
Easter egg: the fish are piranhas. You will get bitten if you don't do as described.
Click on the pirate's eye patch and insert the pearl into his eye.
Examine the revealed panel on the statue, and use the stamp to open a secret passage.
DOC'S HIDEOUT
You get captured. When you wake up, Pedro di Helgos, claims to have subdued Doc and saved you.
Use one of the following options in the conversation:
2-2-1-2-1 or
2-2-2-1-2-1
BATHROOM
Click on the waste bin and click on the paper - it's unimportant.
Open the waste bin again and get the syringe.
Click on the left jar, open it and use the syringe on the formalin.
Examine the left wall and click on the dented tile to open a secret closet.
Click on the top shelf, use the formalin on the empty perfume spray and take it.
Leave the bathroom.
INSPECTOR
Use the spray on the inspector.
Go to the lounge.
ORGAN ROOM
Get the final newspaper on the left (6/6) - notice the current month in it (changes from game to game).
Use your lamp on the microscope, notice the word 'BADGE' and the location of the plus-sign (which is a half-note - location may change). Write it down.
Optional: use the signet ring on the microscope to reveal a random birth date.
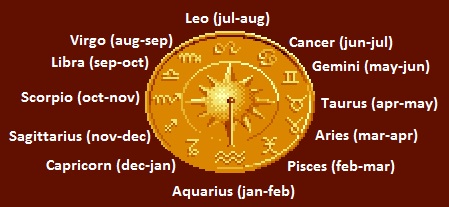
Examine the painting called 'Nudity's dream' and press the button in the top left corner to reveal a zodiac.
Click on the wheel and push on the bottom right button to activate an organ.
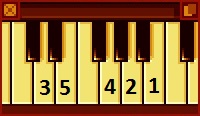
Click on the organ to reveal a keyboard.
Place Doc's zodiac sign (you know the current month from the newspaper and when Doc celebrated his birthday from newspaper X).
The keyboard layout (white keys) is C-D-E-F-G-A-B-C. Play 'BADGE' with the note with plus-sign being a half note up.
A secret passage opens. If not, then set the wheel to another zodiac sign, turn the organ off and back on, and try again.
SECRET ROOM
You are trapped. Search the pocket of the prisoner to get a lighter.
Put the newspapers on the table and light them lighter to escape.