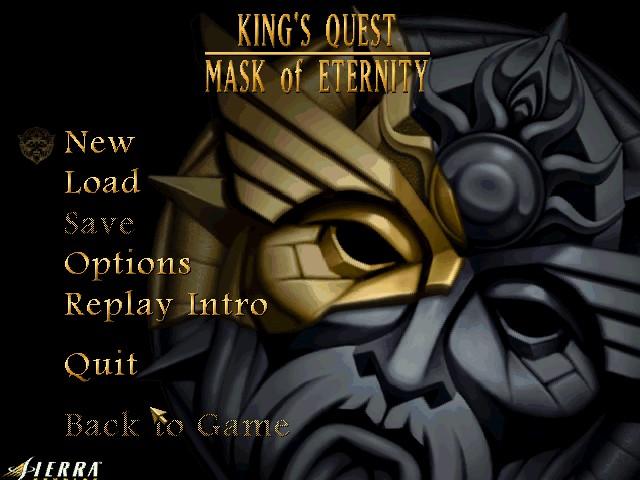
NEW: Click on this or press ENTER with the Mask icon next to it to start a new game.
LOAD: Click on this or press ENTER with the Mask icon next to it to go to the Load Game screen. Once there, you can load a previously saved game.
SAVE: Click on this or press ENTER with the Mask icon next to it to go to the Save Game screen. Once there, you will be able to save your current game and/or multiple games. When you just started the game up from windows and are not playing yet, this option will be blanked out.
OPTIONS: Click on this or press ENTER with the Mask icon next to it to go to the Options screen. Once there, you will be able to set many of the game settings.
REPLAY INTRO: Click on this or press ENTER with the Mask icon next to watch the opening movie. Once the movie starts, you can exit by clicking or pressing ESC.
QUIT: Click on this or press ENTER with the Mask icon next to it to quit the game.
BACK TO GAME: Click on this or press ENTER with the Mask icon next to it to return to a currently running game. When you just started the game up from windows and are not playing yet, this option will be blanked out.
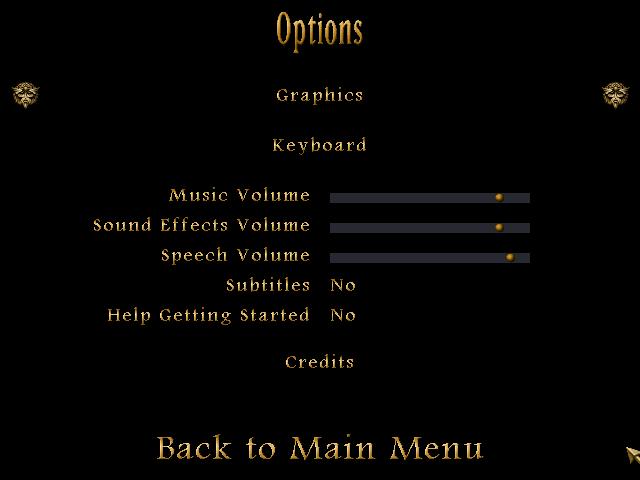
Options menu
Here you can select a number of different game options. When you first install the game, the install will attempt to set all the options specifically for your machine based on your hardware. Here's what can be adjusted:
Graphics: This will take you to a new screen where you can adjust your graphics options. the three graphic modes available are Direct Draw, Direct 3D, and 3DFX. If you have a 3DFX card, Direct 3D will be grayed out as you'll want to run in 3DFX mode. If you don't have a 3D hardware accelarator then both 3DFX and Direct 3D will be grayed out. (Some 3D cards don't support the full set of 3D features required for King's Quest: Mask of Eternity).
640 x 480 resolution is available in all modes. 800x 600 is available ONLY to Direct 3D and 3DFX and then ONLY if your card has at least 4 megs available texture RAM.
- Dynamic Lightning: On/Off: This feature is suggested only for Pentium II/266 or faster. This makes many of the lights in the world dynamic, affecting the objects near them.
- Connor Shadows: On/Off: Available in all modes, this casts a shadow from Connor.
- Monster Shadows: On/Off: This feature is ONLY available if you are running in Direct 3D or 3DFX mode. Like Connor's shadow, this will cast a shadow from all monsters.
- Character shadows: On/Off: Available in all modes, this casts a shadow from all characters beside Connor.
- Object Shadows: On/Off: This feature is ONLY available if you are running in Direct 3D or 3DFX mode. Like Connor's shadow, this will cast a shadow from many of the objects in the world.
- Brightness: Allows you to set how bright the game looks on screen. If this option is greyed out, then your card does not support this kind of gamma control.
Keyboard: This will take you to a new screen that will allow you to remap a number of the game key controls.
Sound volume: You can adjust volumes individually for music, sound effects, and speech.
Subtitles: On/Off: Take a guess...
Help Getting Started: On/Off: This will turn on or off the "help" dialogs that pop up throughout Daventry (the first land). these are very useful if this is your first time playing the game.
Game controls
The interface
There are two main pieces of the onscreen interface, the top and bottom bars. All references to keys assume you have not remapped them.
To get to the top bar, simply move the play cursor to the top of the screen; the top bar will automatically slide down. Moving the play cursor off of this bar will cause it to slide back up and out of the way. (Note that the attack cursors do not activate this bar). features of this top bar from left to right include: the Mask icon to go to the options screen, your inventory items, and gold currency.
The bottom bar can be put away or opened up by pressing the spacebar. If this is closed and you are in combat, the health and experience meter will pop up by itself until combat is complete. Features of this bottom bar from left to right include: armor class and stat, hand weapon and stat, ranged weapon and stat, the health and experience meters, four health and four magic items, the rope and hook, supply of rocks, and the magic map.
Controlling Connor
Connor has two modes of moving: running or walking. Use the END key to toggle between running and walking. Use the four arrow keys to move Connor around. While you are moving around the world, Connor will react to things he runs into, as well as the slope of the ground. If Connor runs straight into an object he will stop. If he hits something at an angle, he will glance off of it and keep moving in the same general direction.
Controlling the camera
In third person the camera will automatically follow Connor around. It will attempt to keep Connor in the middle of the screen. At any time you can take control of the camera. To do this, right-click and hold, then move the mouse. Moving forward or backward with the mouse will zoom the camera in or out. Moving the mouse right or left will swing the camera around Connor. Continuing to hold the right mouse button down while Connor moves will maintain the camera in the same relative position and allow you to track Connor from a constant angle and distance.
The Page Up and Page Down keys are used to tilt the camera view up or down. If you have tilted the camera, it will automatically reset itself as soon as Connor moves.
The Shift key can be used to temporarily modify camera movement. Pressing Shift while right-clicking and moving forward or backward with the mouse will tilt the camera up or down instead of zooming in or out.
F11 toggles the behavior of the third-person camera. Move the camera to the distance you want it to stay from Connor and then press F11. the camera will now stay that same distance from Connor. the default behavior for the right-click camera movement is now changed. Right-click and move the mouse forward or backward; the camera will now tilt up or down. Shift right-click now zooms.
First-person/Third-person
At anytime you can change between playing in first-person and third-person mode. F2 toggles between the two modes. while the game is best played in third-person, you can play all of it in first-person. However, we recommend you play it in third-person and use the first-person mode for special cases where you might want to look at something close up. If you are playing in first-person, any hands-off scenes will jump you into third-person so you can see the interaction. Switching to first-person is disabled in hands-off scenes.
The cursors
There are four game cursors: 1) the play cursor (a gold arrow); 2) the hand weapon cursor (a sword); 3) the ranged weapon cursor (a bow arrow); and 4) the wait cursor (the spinning mask).
The play cursor looks like a golden arrow pointer. Use this cursor to click on items to select them, get information about them, and/or start conversations with other characters. Actions for the cursor include: DO, TALK, and TAKE, but never ATTACK. To temporarily change to the play cursor without having to put away your weapon, press CTRL. This is a temporary switch to play the cursor. Releasing the CTRL key will change the cursor back to the prior attack cursor.
there are many different weapons Connor can find while exploring. regardless of the weapon Connor may currently have, the hand weapon cursor always looks like a sword, and the ranged weapon cursor always looks like an arrow from a bow. With these two attack cursors you shoot or swing at the object you click on. these can also be used to start conversations. The difference between the attack cursors and the play cursor is that the default action for the attack cursor is attack unless it is clicked on a character with whom you can talk. It is never DO or TAKE. If you want to look at something or pick up an item, you need to click it with the play cursor.
The wait cursor looks like a rotating image of the Mask,and gets moved to the right-lower corner of the game screen. When the cursor is in this mode, it means you are in a hands-off sequence. During these times you cannot move Connor, and monsters cannot attack. Just watch and enjoy the scene.
Conversations
Throughout the game Connor will meet helpful characters and interact with them. When you click on one of those characters, Connor will begin a conversation. During a conversation, as long as it's not a hands-off scene, you remain in complete control of the camera and Connor. If you don't move the camera, the program will automatically make camera cuts to better tell the story. If you move the camera at any time, all future camera cuts for that conversation will be terminated. If you walk Connor away during a conversation, the conversation will end. If you return from one of these interrupted conversations, the character will pick up where he or she left off.
Listen carefully to conversations. Characters give important clues to puzzles. Sometimes it takes several clicks to get to the end of the conversation. Just because the character has stopped talking doesn't mean that they have nothing else to say. Clicking on a character after exhausting the talk string will result in the playing of a summation. You will never miss an important message.
Pushing
Connor can push and move many objects in this game. To get Connor to push something, stand him next to it. From a stopped position, move him forward, if it's something he can push, he'll automatically go into push mode. As long as you keep moving him forward he'll continue to push. If he stops pushing and you're still trying to move forward, then the object he is pushing has run into something that is preventing it from moving further forward.
Pushing cannot be initiated when Connor's hands are full. In other words, you can't have a weapon out while pushing. If you want to push something, you will have to put away your weapon first.
Jumping
Connor has three different kinds of jumps: 1) the standing or walking jump; 2) the running jump; and 3) the back flip. The standing jump moves Connor forward about six feet and he clears a height of about four feet. His running jump moves him forward about thirty feet and he clears a height of about six feet. The back flip moves him backward about eight feet and he clears a height of about six feet.
To do a standing or walking jump, simply press INSERT. You can press this either while standing or while walking forward. to do a running jump, you must be in the run mode. While running forward press INSERT and Connor will do a running jump. To do a back flip you can be either in run or walk mode, it doesn't matter. Simply walk Connor backwards and press INSERT to make Connor do a back flip.
You will find a number of places where you will want to use these jumps to get over obstacles, jump up on something, or cross areas of trouble. remember that each jump clears a defined distance. Also, take gravity into consideration. Jumping from a high to a low spot will increase the length of the jump, whereas jumping from a low to a high spot will shorten the distance. Be careful jumping from high places. If Connor falls more than fifteen feet, he will die.
The rope and hook
During the course of game play you'll find a rope and hook. The rope and hook can be used to climb up and down things. Places where you can use the rope and hook are identified by a rope and hook/arrow icon at the bottom right of the game screen. When you see this it means you can climb something nearby. To use the rope and hook, click on its icon in the lower bar. the cursor will change to the rope and hook. Now click on the object (cliff, wall, building, etc.) you want to climb. Connor will throw the rope and automatically get into "climb" position. Use the arrow keys to make him climb up or down the rope. To get him off the rope move him past the end of the rope and he will automatically get off and put the rope away.
Rocks
Connor will be able to find small boulders in various places. these will be useful for solving certain puzzles. In a number of paces throughout the game Connor will discover pressure plates which depress when stepped upon. Rocks can be used to weigh down these plates. To use one, click on the rocks on the interface. The cursor then becomes a rock. Now click the cursor where you'd like Connor to throw it. Connor can only throw rocks a fairly short distance. If you've clicked beyond his range, he'll throw it as far as he can in the direction you've clicked.
Hand weapons
During the course of game play, Connor will find a number of different hand weapons. Click on the weapon to pick it up. If you already had a hand weapon, it will automatically swap with this one. Connor can only carry one hand weapon at a time. When you pick up a new hand weapon, watch the stats for hand weapons to determine which one you want to keep. Keep the one that displays the highest number.
To use a hand weapon, click on the hand weapon icon on the interface. Once the hand weapon is out and Connor is ready, the cursor will look like a sword. Each left-click will now make Connor swing in the direction you've clicked. If you click behind him, he will automatically turn around and swing. for hand weapons, Connor will need to be close enough to an object to hit it. Connor will always swing, but if he's not close enough, he'll just hit dead air. Pressing DEL switches between weapons.
With hand weapons you can choose two kinds of attacks: the standard attack or the "big" swing. The standard attack is done with a simple left-click. This is the quickest kind of attack, but does not deliver the biggest blow. to do the "big" swing, hold down SHIFT while left-clicking. Connor will take the big swing and deliver between .75 to 5 times the possible damage. Be careful in using this. While Connor usually delivers greater damage, it also takes him longer to make this kind of swing. When fighting one opponent this might prove effective. However, if battling a group, a quicker attack might prove more effective.
Ranged weapons
During the course of game play, Connor will find a number of different ranged weapons. Click on the weapon to pick it up. If you already had a ranged weapon it will automatically swap with this one. Connor can only carry one ranged weapon at a time. When you pick up a ranged weapon, watch the stats for ranged weapons to determine which one you want to keep. You will want to keep the one that displays the highest number.
To use a ranged weapon, click on the ranged weapon icon on the interface or press DEL. This will make Connor draw his ranged weapon. Once the weapon is out and Connor is ready, the cursor will look like an arrow from a bow. Each left-click will now make Connor shoot in the direction you've clicked. If you click behind him, he will automatically turn around and shoot. Ranged weapons can shoot in any direction at any time. You don't have to click on an object to shoot. This is important to remember as often in combat monsters might be moving around. Be careful to lead moving monsters with your shot. Clicking on a moving monster will cause Connor to shoot where the monster is, and by the time the arrow gets there the creature may no longer be there.
Note about weapons: In a couple of places, Connor will pick up a new weapon and in the course of doing so will lose his old weapon. don't worry about this, it is part of the design, and in these cases the new weapon will ALWAYS be better or be exactly what you need.
Armor
During the course of game play, Connor will find various kinds of armor (gloves, boots, breastplates, etc.). Click on the object to pick it up. If you don't have a piece of armor, Connor will simply put it on and you'll see his armor stat increase. If he already has a piece of armor, then just like the weapons, you'll see it swap ( for example swap a leather breastplate for a bronze breastplate). when you obtain a new piece of armor, watch the armor stat to determine which one you want to keep. Keep the one that displays the highest number. some armor comes as a complete suit. If you are wearing a suit of armor and click on a single piece like gloves, Connor will remove the full suit to put on the single item. In almost all cases you'll want to keep a full suit over swapping for a single item. Just be careful and make sure you keep what gives you the highest armor stat.
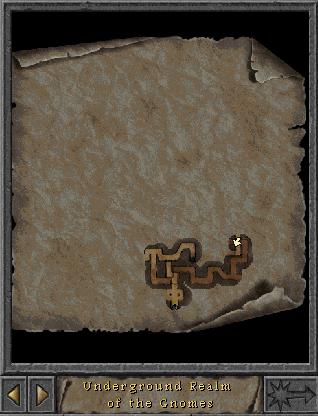
The magic map and teleporting
During the course of game play, you will find a magic map. the magic map can be opened and closed by clicking on the map icon on the interface or pressing TAB. the magic map will track everywhere Connor goes. the forward and backward arrows under the map allow you to page through the maps of the various displayed worlds. At the center of each map is the name of the current world.
Located at the bottom right of the map is a teleport button. Each world has one teleportation location except the Realm of the Sun, the final world. Once you find these you can then teleport between teleportation locations. This button will be grayed out until it's possible to teleport. to teleport, open the map. Make sure Connor is standing on the teleporter in the current world. Now page to another map where you have ALREADY discovered the teleportation location. the button will now be active. click on the teleport button. Connor will disappear, and the world displayed on the map will be loaded. Once it's loaded you will see Connor appear on the teleportation location in the new land.
The map is very interactive. As you change things in the world, the map will often reflect these changes. Opening a locked door may reveal the door open on the map where before it was closed. Pay special attention to potential changes on the map as Connor does actions to trigger these changes. Note that changes could occur elsewhere in his current world besides where he is standing.
Gold
As Connor travels he will find gold hidden in places, and some monsters will drop gold when they die. Make sure you take any gold you find. there are several places throughout the game where you'll be able to buy items and information. To use the gold, click on the gold icon on the interface. the cursor turns into gold coins. Now click where you want to use it. If you have enough gold in your inventory, your gold will automatically be reduced by the proper amount and the exchange will be made.
Inventory items
On the top interface is a section containing seven boxes used for storing inventory items. If you have more than seven inventory items you can use the arrow buttons at either end of the inventory to scroll. To use an inventory item, simply left-click on it. the cursor changes to the item. Now left-click where you want to use it. If it can be used there, something will happen. To get information about an inventory item, right-click on it. Connor will give you a spoken description of its attributes.
Health and magic items
In the middle of the bottom interface is a section containing eight small boxes. This is where health and magic potions are stored. the four boxes on the left are for the four types of health items Connor can find (sorted by strength from left to right; least powerful to most powerful). The four boxes on the right are for the four kinds of magic potions Connor can find. when Connor uses a magic potion an icon will appear at the bottom right corner of the screen. the icon is a timer. You'll notice it seems to empty out, as does liquid from a bottle. As soon as it completely empties, the potion's effect will wear off.
The four magic potions sorted in order from left to right, and their timer icons are:
Potion of shield: While under this spell Connor's protection stat increases to 50% or by 50%, whichever is greater.
Potion of strength: This potion increases Connor's hand weapon stat to 150% of its current value. for example: If Connor's hand weapon stat is 100 and this potion gets used, it will increase to 150 for the duration of the timer.
Potion of reveal: While under the influence of this potion, connor cannot be fooled by magic or invisibility. Things that are invisible will be come visible, and things that are illusionary will be revealed.
Potion of invisibility: Using this potion turns Connor invisible to many of the evil minions, and some of the lesser forms of life. Be warned that this potion does not work against some of the greater creatures that have been sent forth, nor does it work against any of the other more advanced forms of life or characters.
All of these eight items, both health and magic, can be accessed via hotkeys. While you can simply left-click on these to use them, you can also use them by pressing their associated hotkey, the number keys 1 through 8. the eight items line up left to right with the number keys 1 through 8. This allows you to access them quickly during combat.
The Mask
The Mask icon serves two purposes. each time Connor finds a Mask piece, you'll see it appear here as well as in inventory. This will give you an easy visualization of how many pieces you have found. This is what the game is all about - as Connor will find out soon enough, his quest is to find all of the pieces of the broken Mask of Eternity and return them to their rightful place.
If you right-click on the Mask, Connor will tell you how many pieces he has found. A left-click (or pressing ESC) will take you to the main menu.
Health and experience meters
at the bottom center of the interface are two little meters, one red and one green. the red meter shows the state of Connor's health. Don't let this one drop to empty or Connor will die and you'll have to load a saved game.
The green meter shows Connor's progress via experience points. As Connor explores the world he gains experience. Experience can be gained by winning in combat, solving a puzzle, gaining new knowledge, and by meeting and talking to characters. When the experience meter reaches the top it gets reset; your combat stats increase and your health increases and gets reset to 100%. In other words, the higher Connor's level, the stronger he is. (Note: keep in mind Connor's health gets reset to 100% on level jumps. Don't waste health items!)
Each time you gain a level the experience points required to get to the next level is doubled until you reach level 15. Once Connor reaches level 15 the amount of experience points needed to gain a level gets fixed for the rest of the game. Each level is worth 10 points of health. For example: if Connor is a level 5, with a full health meter he has 50 points of health which allows him to take 50 points of damage before dying. If he's a level 22, a full health meter represents 220 points.


 The play cursor looks like a golden arrow pointer. Use this cursor to click on items to select them, get information about them, and/or start conversations with other characters. Actions for the cursor include: DO, TALK, and TAKE, but never ATTACK. To temporarily change to the play cursor without having to put away your weapon, press CTRL. This is a temporary switch to play the cursor. Releasing the CTRL key will change the cursor back to the prior attack cursor.
 there are many different weapons Connor can find while exploring. regardless of the weapon Connor may currently have, the hand weapon cursor always looks like a sword, and the ranged weapon cursor always looks like an arrow from a bow. With these two attack cursors you shoot or swing at the object you click on. these can also be used to start conversations. The difference between the attack cursors and the play cursor is that the default action for the attack cursor is attack unless it is clicked on a character with whom you can talk. It is never DO or TAKE. If you want to look at something or pick up an item, you need to click it with the play cursor.