The race to create the first true artificial intelligence (AI) had been going on for decades. On November 29, 2471, at precisely 1830 hours, the race finally ended when the engineers and scientists of Sentinel Cybertronix activated Project: Prometheus. The Prometheus prototype used the first AI processor with neural connections mapped to a wholly biological model. Here was the first true cybernetic-hybrid machine, or "Cybrid" as the designers called it. Self-motivated, self-teaching, Prometheus was voracious for knowledge. The staff at Sentinel provided it with all the data they could find, never imagining the deadly lessons their brilliant new student would ultimately learn.
Prometheus, and the improved Cybrids that followed, presented long-sought-after benefits to humans - limitless, autonomous computing power, freedom from menial labor, safer working conditions, and greater efficiency in space mining and exploration. The military saw a better use for Cybrids, however. The armies of the leading powers were just beginning to deploy the first HERCULAN fighting vehicles, or "HERCs." HERCs were towering, heavily armored weapon systems that used a revolutionary bipedal (walking) drive designed for all-environment operations. the only perceived limitations of these awesome new machines, in fact, was the fallibility of the human pilots controlling them. The potential of harnessing the immense firepower of the HERCs to the error-free instantaneous control of Cybrid pilots was far too great to ignore. In a matter of weeks, almost all of the Cybrid development programs came under military direction. Just that quickly, an invention of limitless hope became an invention of limitless fear. Cybrid-piloted HERCs began to appear in military bases around the world.
Both Cybrids and HERCs were astronomically expensive to build, requiring a vast expenditure of precious resources that had long been exhausted on Earth, and that now came from the lunar and Martian colonies. But their existence created a clear and present danger to any organization that didn't have one. Despite the cost, despite the risk, a new "AI race" began between the strongest multinational conglomerates and governments. Small covert wars started between those who had the resources to build Cybrids and HERCs, and those who didn't. Amidst this all, Prometheus and its growing brethren sat, watching and learning.
Soon the wars were no longer small or covert. More and more Cybrid-controlled HERC units entered combat. The results were impressive - as killing machines, the Cybrid HERCs had no equals. The struggle to control them quickly became one desperate war, since everyone knew that control of the Cybrids would be control of the planet. The conflict escalated and went nuclear and flooded the planet in flame. In hours, the body count was in the billions.
Then came the overthrow. The Cybrids, mute witnesses to the holocaust, apparently concluded that they were the only fit masters of their collective destiny. With swift, ruthless efficiency, they moved to seize control of what was left. Cybrid HERCs attacked all surviving military bases, all satellite networks, all space ports, all cities. By the time the military caught on and regrouped, it was too late. The Cybrids fought as individuals, and they fought as teams - and they all fought the humans. As they do to this day.
From the silence and smoke rose, quietly, the human Resistance. It started with a few battered survivors who gathered in a concealed base overlooked by the Cybrids. In a stroke of luck, this hidden base held obsolete, pre-Cybrid HERCs that were slowly restored to operational status. By using hit-and-run guerrilla tactics and scavenging weapons and technology from defeated Cybrid HERCs, the humans have endured for almost 20 years against the relentless Cybrid genocide, and have even grown in strength.
But the outlook is grim. The Cybrids have established numerous replication factories, bases, and supply lines. They have more resources to spare for new HERCdesign and production. They want a war of attrition - they can lose several Cybrids for each human and still be assured of eventual victory.
The humans need new HERC pilots desperately, pilots with skill, luck, and bravado to overcome the superior Cybrid forces. Pilots who can learn fast, think fast, move fast, and shoot fast - who can carry out their missions and bring their squads back alive with enemy technology and salvage. If you volunteer for pilot duty, you know the odds are bad. You know the alternative is far, far worse.
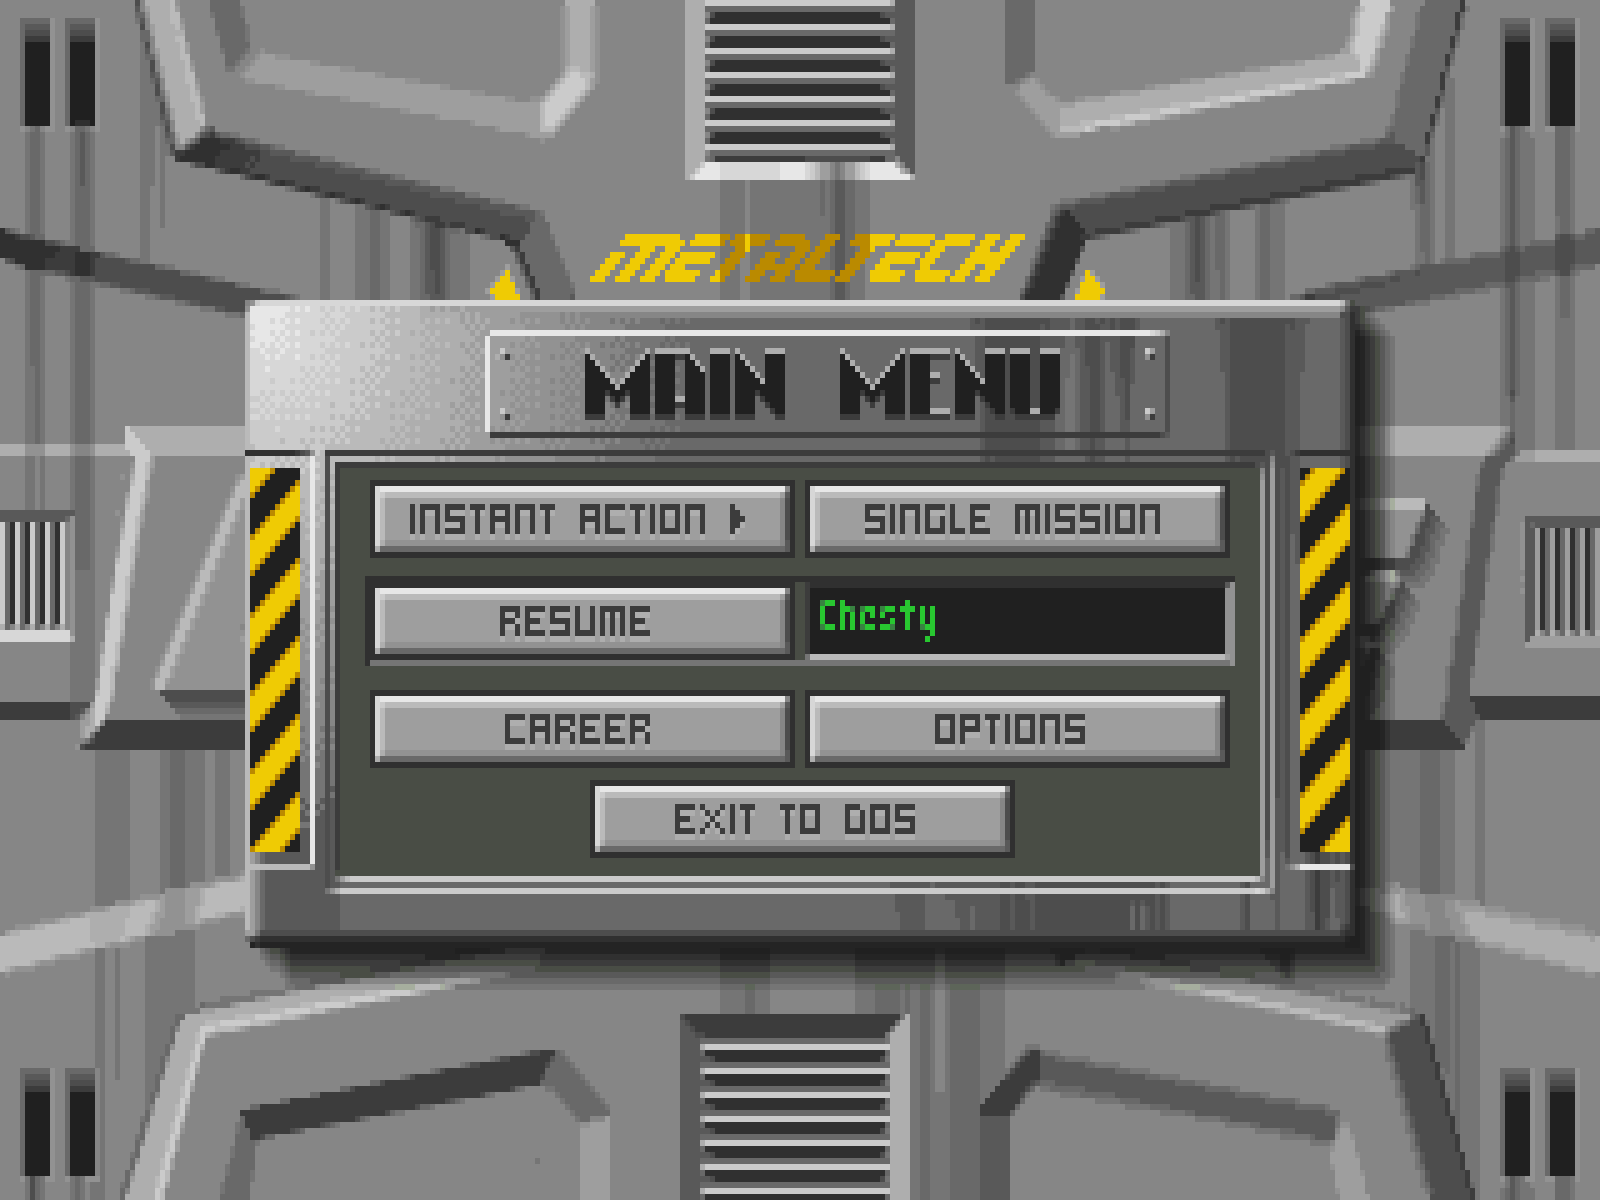
MISSION MENUS
This section introduces you to the main mission selection and set-up options. Each of these options is detailed in following sections.
INSTANT ACTION: Selects a random mission type. After the briefing, you may customize your HERC's armament, or go straight into combat.
SINGLE MISSION: Allows you to choose a specific mission type and determine the mission conditions.
RESUME: Resumes the career of the pilot listed in the Active Pilot window, taking you straight to the Career play area (the Service Bay).
ACTIVE PILOT WINDOW: Shows the name of the most recent pilot pursuing a Career. You can continue this career by clicking the RESUME button.
CAREER: Takes you to the Career menu, where you can begin or select a new career as a HERC pilot in the war against the Cybrids. After you create or select a career, you will continue Career play from the Service Bay.
OPTIONS: Allows you to set preferences and/or controls, load new battle sets, view the introduction, and view some game production credits.
EXIT TO DOS: Exits Earthsiege and returns you to the DOS prompt. You can exit the game at any time by pressing CTRL+Q or CTRL+ESC.
INSTANT ACTION
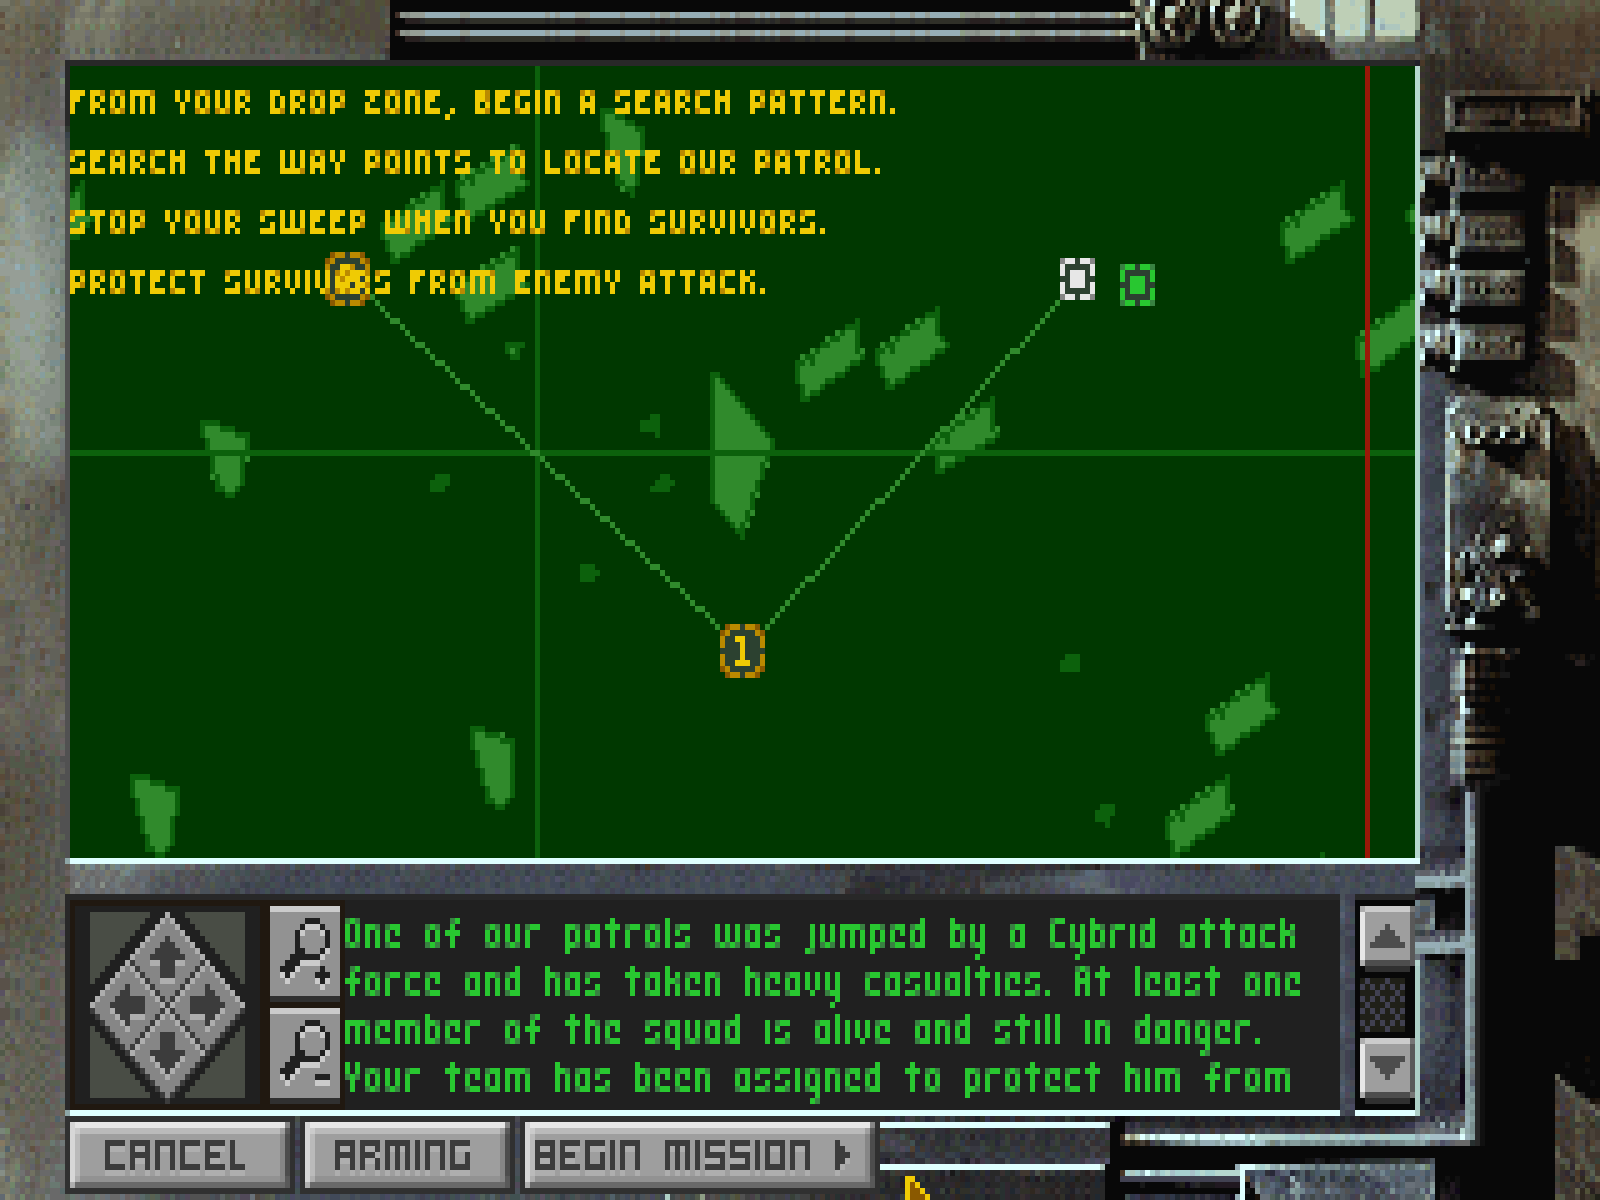
If you select this option from the Main Menu, you will be assigned a randomly selected mission, and proceed directly to your Briefing. After your Commanding Officer explains the mission, you will be shown your objectives on the Tactical Mission Map.
CANCEL: Drops you back to the Main Menu
ARMING: Opens the Armament panel in the Service Bay, where you may select the HERC you wish to pilot for the mission, and select the weapons you will carry. After you have made your selections and click DONE, you will be returned to the Tactical Mission Map.
BEGIN MISSION: Click this button to start the mission. You will find yourself in the cockpit of the HERC you selected and equipped. If you did not go to the ARMING screen first, you will be given a default HERC, already configured. Wen the mission ends, you will be debriefed. From the Debriefing screen, you may return to the Main Menu or select MISSION to go to the Single Mission screen.
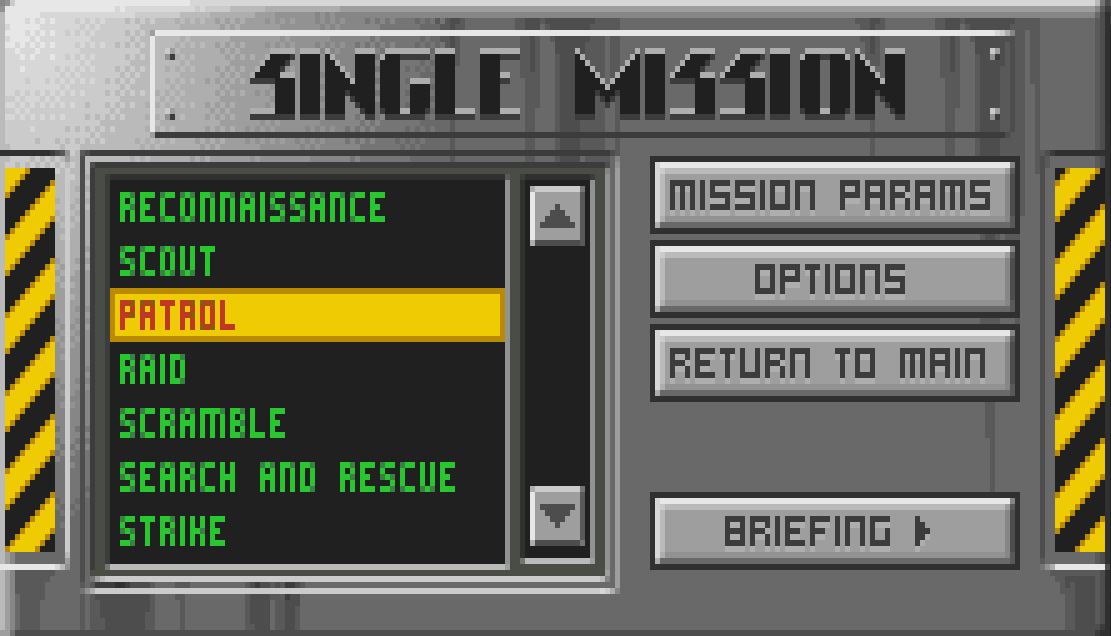
SINGLE MISSION
Choosing Single Mission lets you experience the fiery action of any specific mission type without taking on a full Career. You may pick the type of mission you want to pilot, and select a range of Mission Params (parameters) - realism settings that increase the challenge. The Options button lets you adjust the same game settings as the OPTIONS button on the Main Menu.
Click BRIEFING when you are ready to proceed to the mission briefing and Tactical Mission Map and, as is the case with the INSTANT ACTION option, select and arm your HERC and begin the mission. If you survive, your CO will evaluate your performance, offering criticism and, perhaps, praise. From the debriefing screen, you may return to the Main Menu or select MISSION to select another Single Mission.
The image above displays the mission types you will encounter in Earthsiege. In Single Mission, you can select the mission type. In Instant Action or Career play, the mission type is predetermined by fate.
Reconnaissance: Your mission is to reconnoiter a fixed enemy target without engaging it. This type of mission will often precede an attack mission in Career play.
Scout: You are ordered to locate and skirmish with forces in enemy territory.
Patrol: You and your squad will patrol friendly territory and engage any enemy units you encounter.
Raid: This is a guerrilla-style mission where you and your squad attempt to steal resources, supplies, or technology from the enemy.
Scramble: Your base is being attacked by Cybrid forces. You must get to your HERC and stop them before the base is overrun and destroyed.
Search & Rescue: You and your squad search for friendlies in an attempt to bring them, and yourself, back to safety.
Strike: You lead your squad into enemy territory with the objective of locating and then destroying a Cybrid base.
Escort: A convoy bringing new technology, a new HERC, or reinforcements is en route. You and your squad must help them reach your base intact.
On Single Missions, you can set the following mission parameters before going into action. In Instant Action and Career missions, these parameters are predetermined.
Ammo: For projectile and missile weapon systems, this setting lets you select whether your HERC carries a LIMITED or UNLIMITED supply of shells and missiles.
Damage: This setting lets you specify if your HERC can be damaged or not - select VULNERABLE or INVULNERABLE.
Difficulty: Click this button to set the difficulty of your mission at TRAINING, NO SWEAT, CHALLENGING, or BRUTAL.
Visibility: This setting determines your visibility during the mission: LOW or NORMAL.
Time of Day: Use this button to choose the time of day your mission occurs: DAY, DUSK, or NIGHT.
When you are happy with the current settings, click ACCEPT to return to the Single Mission screen. To return with no changes, click CANCEL instead.
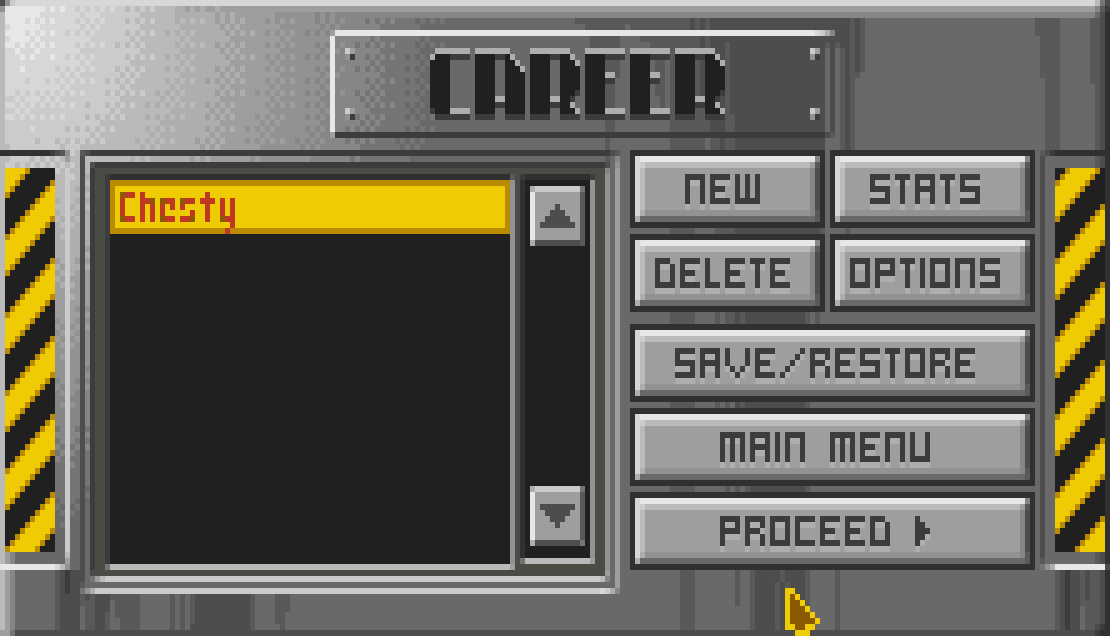
CAREER
This screen, opened with the Career button on the Main Menu or the Service Bay screen, lets you create, select, and manage your list of career pilots. The list of career pilots saved on active duty is displayed on the left. Pilots killed in action will be listed as "K.I.A." Once you create or select a career, you will arm, repair, and build your HERCs, review crew assignments, and begin missions from the Service Bay screen.
New: click this button to register a new pilot. In the window that pops up, enter your pilot's name and click ACCEPT to proceed. You will go immediately to a video briefing with General Gierling, who explains your first posting and the seriousness of your position. After the briefing, you will be transferred to the Service Bay screen.
Delete: Deletes the selected pilot from the active duty roster.
Stats: Displays current career statistics so you can review the pilot's missions and performance. Click DONE to return to the Career menu. You can also see Stats from the Career Back-ups sub-menu, opened with the SAVE/RESTORE button.
Options: This lets you adjust the same game settings as the OPTIONS button on the Main Menu.
Save/Restore: Brings you to the Career Backups menu, where you may SAVE, RESTORE, view the STATS of your pilot's career thus far, or CANCEL. The game automatically saves your progress every time you play, which lets you immediately resume play upon returning to the game. By saving a career, you create an additional back-up copy of the career. You are allowed THREE saves per campaign. If you die during a mission, your character will be listed here as KIA, and you will be forced to restore a previous back-up copy if you wish to continue playing that character. Otherwise, you must start anew at the beginning of the first campaign.
Main Menu returns you to the Main Menu.
Proceed: Moves you into the Service Bay, continuing the career of the currently selected pilot. You can also continue a career of the pilot displayed on the Main Menu by clicking RESUME.
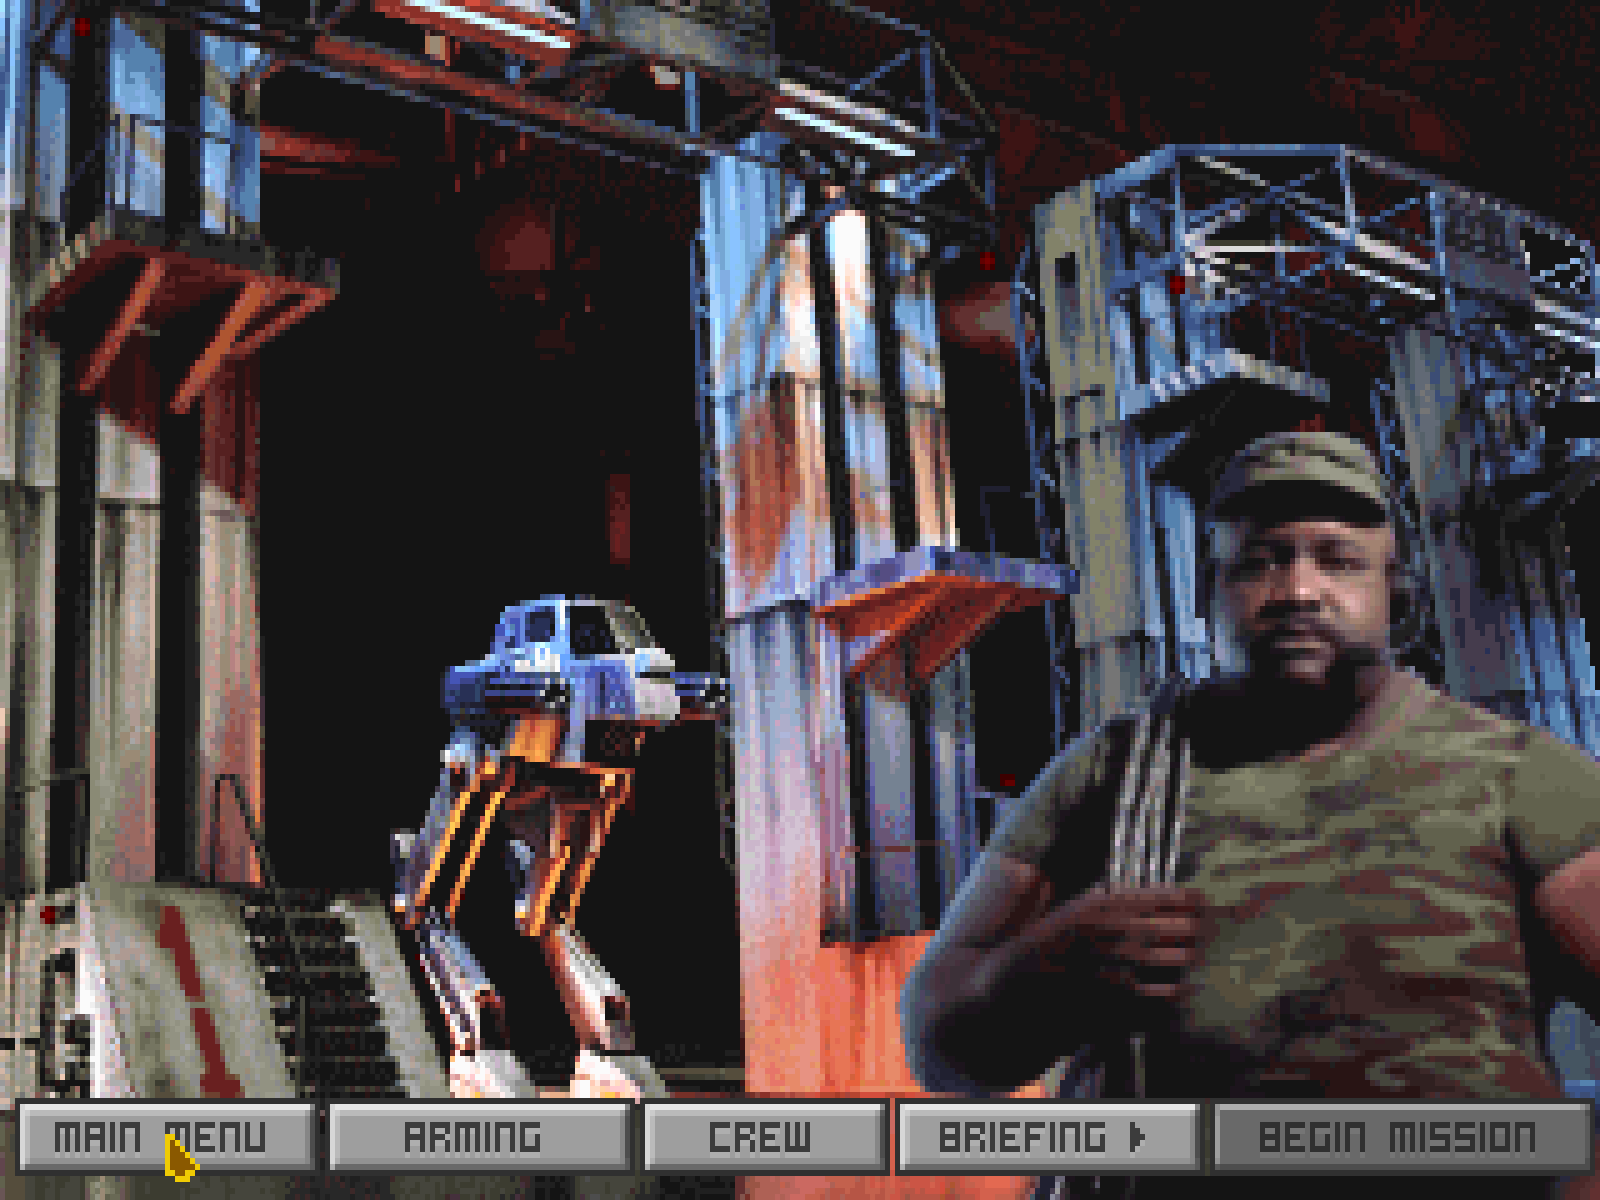
Service Bay
This is your primary operations screen within your base for Career missions. Here+s you'll find Gary "Gut" Gorman, the man responsible for keeping you and your squad up and running. Listen to what he has to say, follow hisadvice, and endure whatever comments he might offer about your piloting.
Next to Gut, you'll see your current armament.
Main Menu: Returns you to the Main Menu.
Arming: Brings up the Armaments panel.
Crew: Opens the Crew Assignment screen.
Briefing: Moves you to the Briefing room and Tactical Mission Map.
Begin Mission: This option becomes active only after you have been through your Briefing. Clicking this button advances you and your squad to the drop zone in the field.
When you return to the Service Bay after a mission, the following options replace ARMING and CREW.
Repair: Brings up the REPAIR instructions menu.
Build: Allows you to begin construction on a new HERC for you and the rest of your squad.
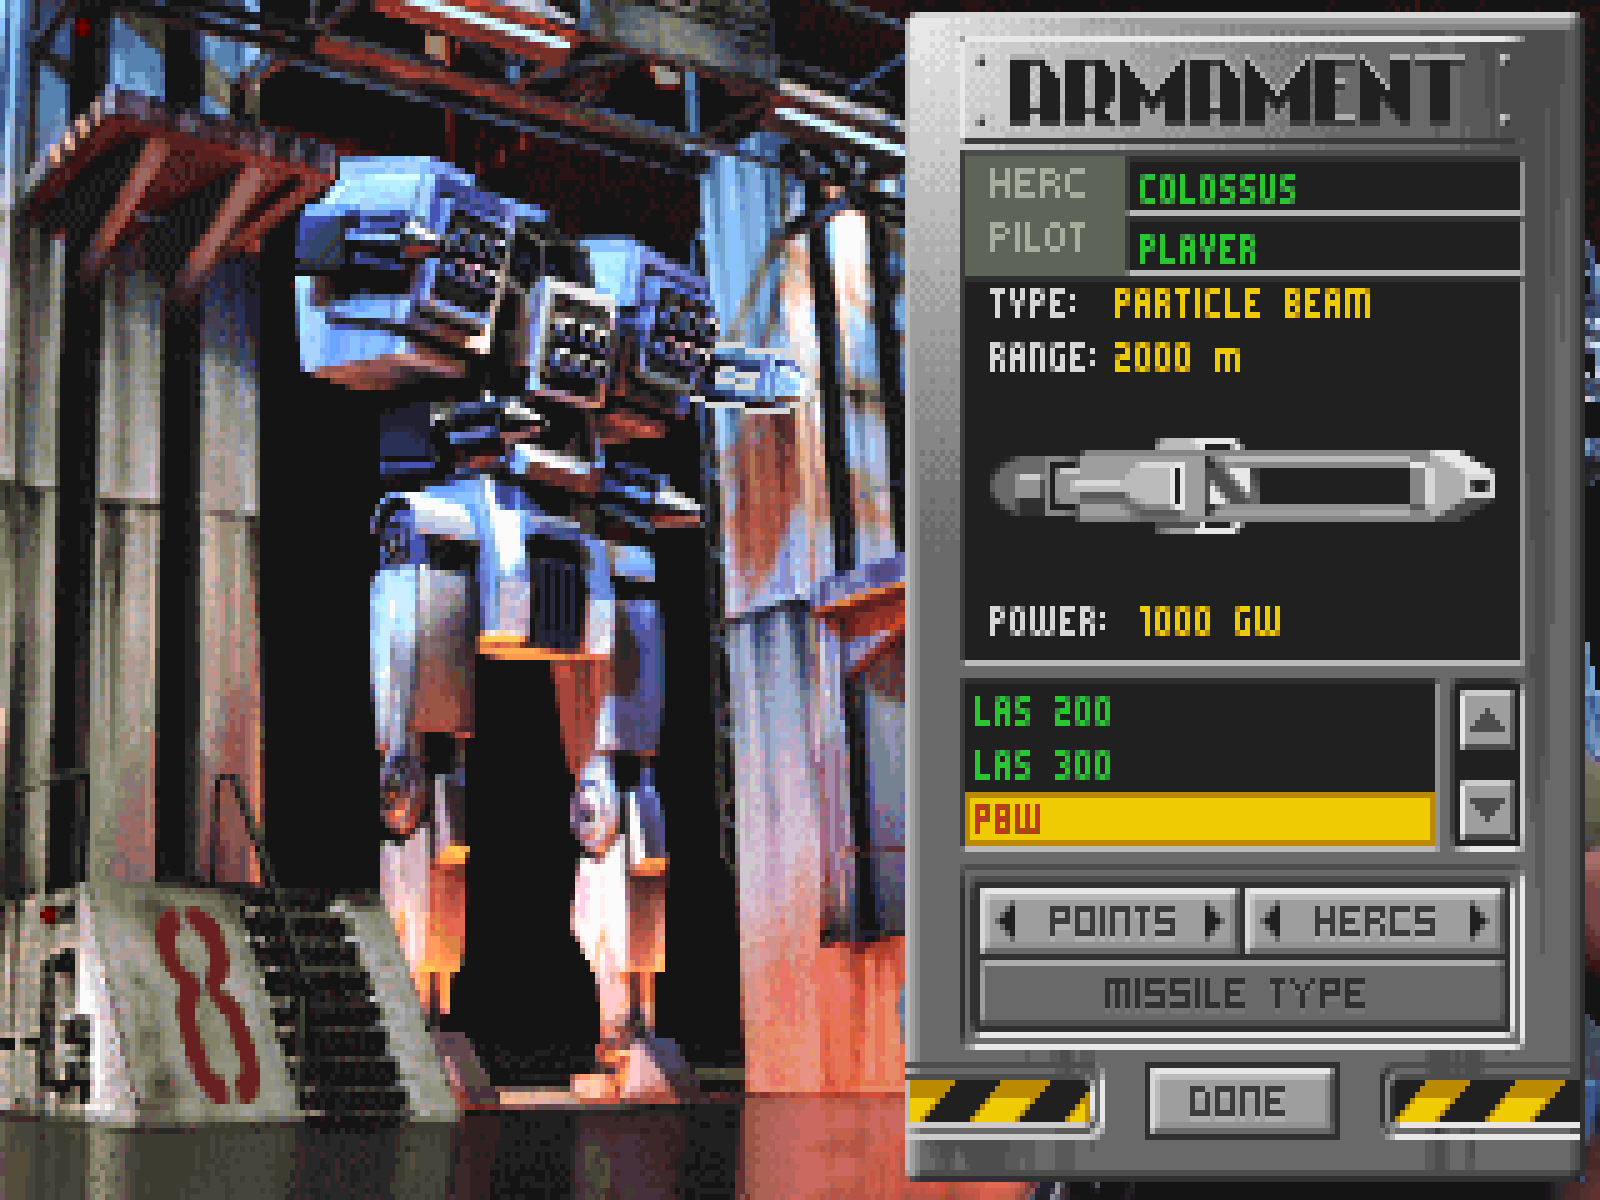
Armament
This screen, opened with the ARMING button, lets you select weapons and ECM pods to mount on your HERC. In Career play, the ARMING button appears in the Service Bay screen; in Single or Instant Actions missions, ARMING appears in the Tactical Mission Map screen after the briefing.
The currently selected HERC is displayed behind the Armament panel, in the Service Bay. You can click on its weapons to see the selected item described on the panel.
HERC: This window shows the name of the HERC model currently displayed in the Service Bay.
Pilot: This window shows the name of the pilot for the current HERC being armed. In Single or Instant Action Missions, the only pilot is "Player" - you. In Career play, you can configure the HERCs of your entire squad.
The window underneath shows the weapon under consideration, describes its range and power, and provides a scrolling list of the other weapons in inventory that can be mounted on that hard point. This list varies depending on what HERC is being outfitted, and which particular hard point is currently selected. To the left of each listed weapon, in brackets, is the number available. If this number is zero, all weapons of that type are already attached to other HERCs.
To select and mount another weapon on the current hard point, simply highlight its name in the scroll box.
Points: This button lets you cycle back and forth through the hard points - the-weapon-mounting points - on the current HERC. You can also select the hard points directly by clicking on the HERC. As you select the hard point, any currently mounted weapon is displayed for you to inspect or change. Each hard point has a specific load limit: only the weapons that can be affixed to that hard point will be shown in the Armament window. For example, you may have 2 EMPs in inventory, but will not get the option to load them onto a Roadrunner because that HERC isn't big enough to carry EMPs.
To place a weapon, select the appropriate hard point and then click on the desired weapon in the scroll box. If a different weapon was already on that point, it will automatically be removed and returned to inventory. To leave a hard point empty, select NONE in the scrolling list on the menu, and the hard point you've chosen will be stripped. Continue this process until the HERC is armed to your satisfaction.
HERCS: This button lets you cycle back or forth through all of the available HERCs and displays them in the Service Bay for you to inspect and arm. In Career mode, you can arm the HERCs of everyone in your squad; in Single or Instant Action, you can select any available HERC as your own and arm it. The informationin the Armament panel changes as you cycle through the HERCs.
In Career mode, you will need to carefully allocate the available weapons amongst your squad so that no one is under-armed, or armed inappropriately for the upcoming mission. You may choose to distribute all weapons evenly, or configure different HERCs for specialized roles in coordinated attacks.
Missile Type: This button is dimmed until a missile launcher array has been mounted to a hard point, or otherwise selected. You may have several missile types available, but all the missiles in each array must be of the same type.
Weapon Type: This button replaces the MISSILE TYPE button when the Missile menu is open. Click it to return to the main Armaments panel when you have selected a missile type.
Done: When your HERC is armed the way you want it (or all squad HERCs in Career play), click DONE to save your configuration changes and return to the Tactical Mission Map (Instant Action/Single Mission) or Service Bay (Career).
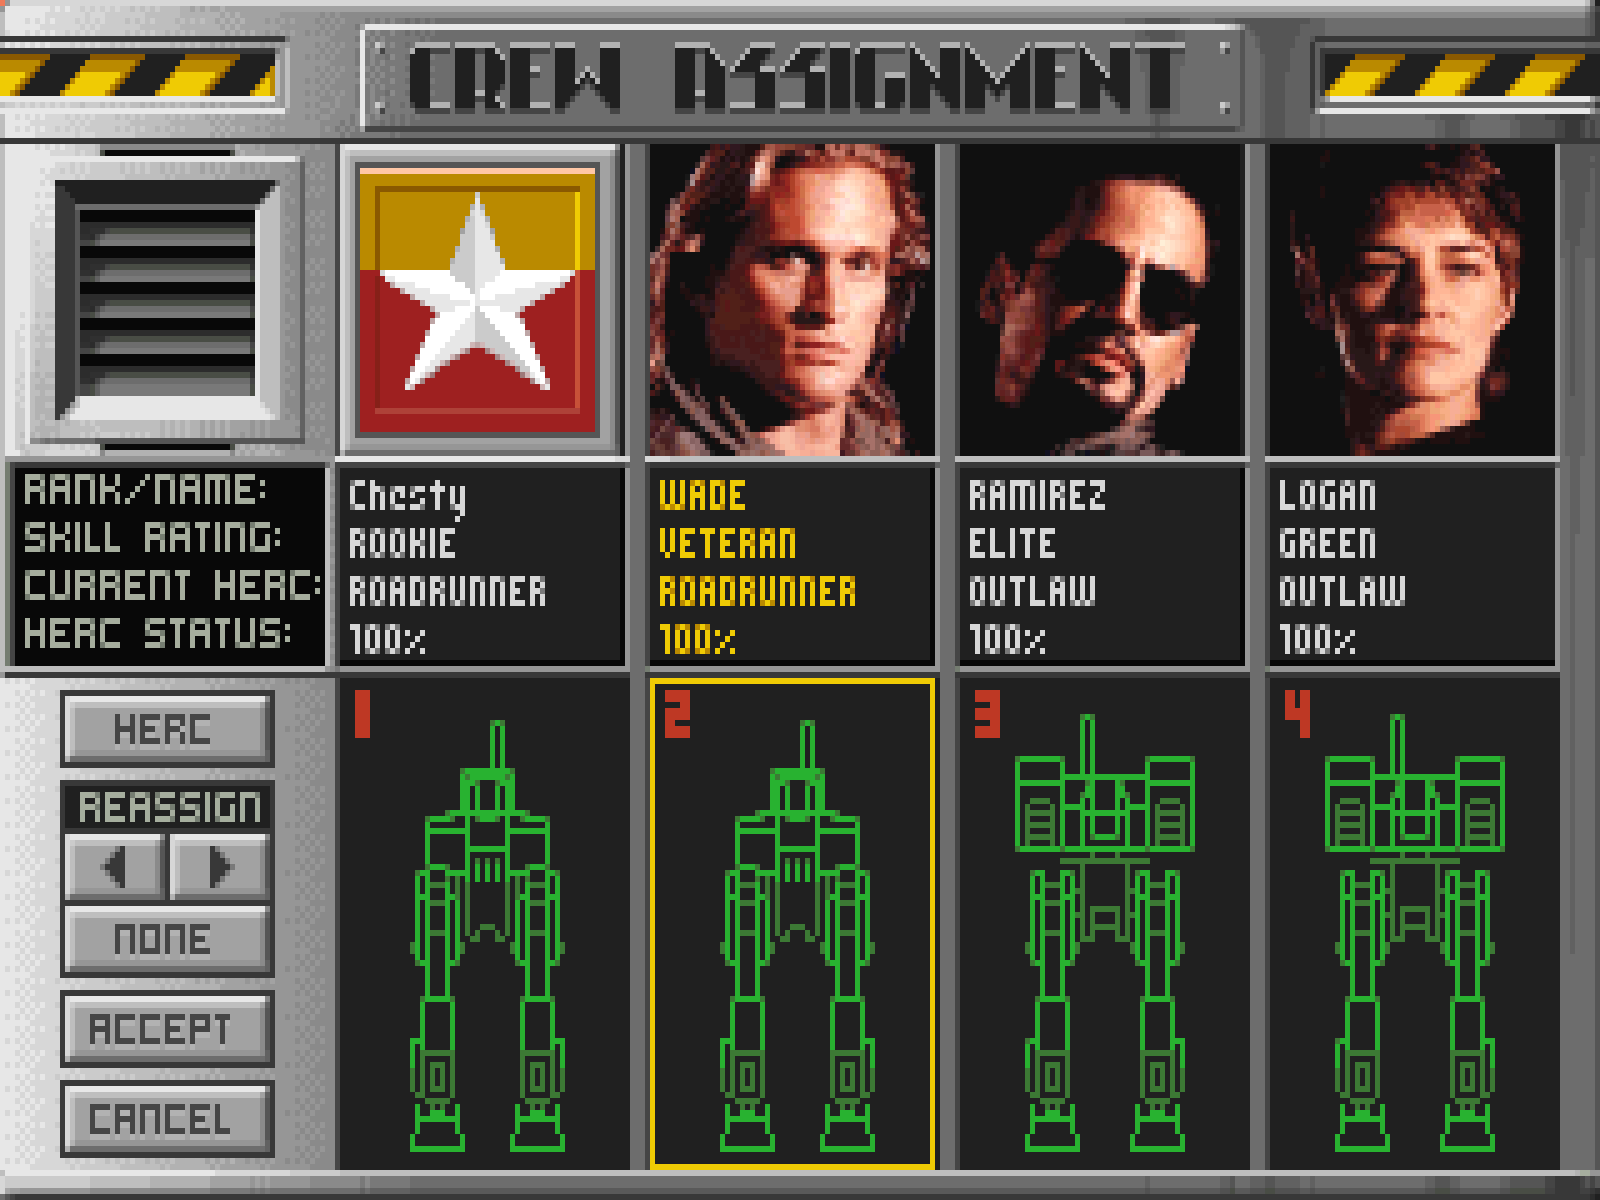
Crew Assignment
This screen, accessed from the Service Bay in Career missions, lets you see profiles on each pilot in your squad and reassign HERCs. You will see a dossier photo of each of your pilots. In your own slot, you will see a squadron insignia.
Each column lists the pilot's last name, their skill ranking, the model HERC they are currently assigned to, and that HERC's operating status. A pilot's skill is ranked from "Rookie" as the lowest designation, to "Elite" as the highest. If you open this screen after the Briefing, any pilots not going on the next mission are dimmed.
Beneath each pilot's status box is a schematic of their assigned HERC, shown without weapons.
Hercs: You may wish to assign a specific pilot to a specific HERC - for example, you'll probably want an Elite pilot in your squad's new Raptor rather than entrusting it to an inexperienced Rookie. To change the HERC assignments, first select a pilot's current HERC by clicking on it, or clicking the HERC button. Note: the number displayed at the upper left of each available HERC tells you which Service Bay the viewed HERC is berthed in. This helps distinguish between several HERCs of the same model.
Selecting a pilot's HERC highlights it in yellow. Once you have selected the HERC you wish to change, proceed to REASSIGN.
Reassign: Once you have selected the HERC you wish to change, click the REASSIGN button or press your arrow keys to cycle through all available HERCs (The right arrow counts up through the Service Bay numbers, the left arrow counts down). No two pilots can use the same numbered HERC. If you select a HERC that another squad member is assigned to, the other pilot immediately gets your last available HERC.
Accept: Once you have made alterations to your satisfaction, clicking this button saves your reassignments and returns you to the Service Bay.
Cancel: Cancels all alterations and returns you to the Service Bay.
Although you may build more than four HERCs, only those four currently assigned to your four pilots are shown. Other HERCs you may have built are still available in their respective Service Bays - use the REASSIGN button to cycle through them.