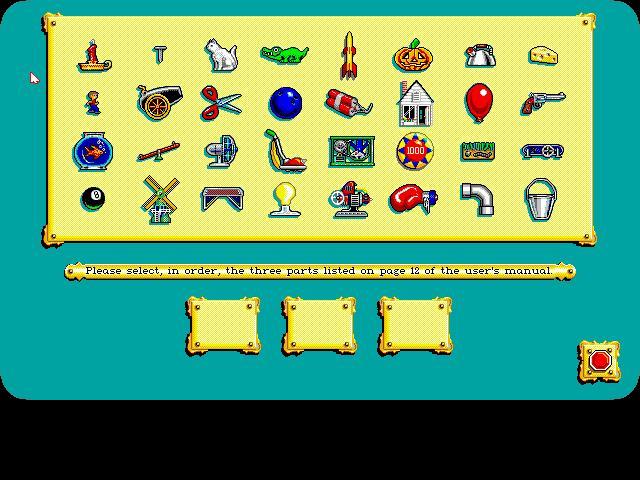
Click during the game's intro or game credits screen to start the game. You will first have to select the correct machine parts in the password screen.
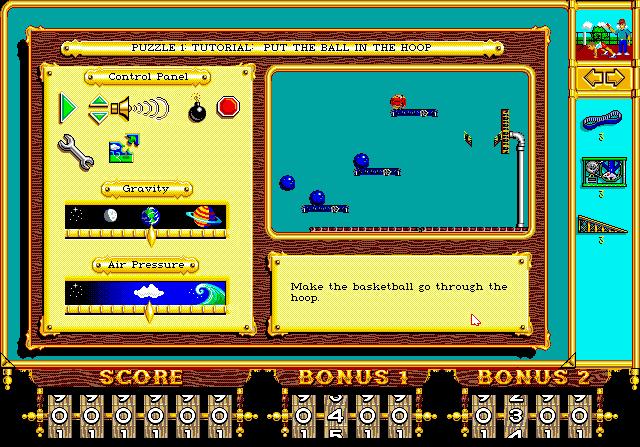
Control panel and preview screen
After passing the copy protection check, you will see the control panel and puzzle preview. This screen appears before each mission and can be accessed during game play by right-clicking the mouse.
On the top of the window, you can see the number and title of the puzzle. The game has a total of 160 premade puzzles which become more difficult as you progress. On the right side of the window are the puzzle preview picture and the puzzle goal is written below it.
The left section of the window is the control panel. Press the large green arrow or the puzzle preview picture to play the puzzle. Press the smaller green arrow to increase or decrease music volume. If you were playing the puzzle and returned to the control panel by right-clicking the mouse, you can click the bomb to clear the machine parts which you have already placed on the puzzle window and restart the puzzle. Click the red button to quit the game. Click the wrench to go to Free Form Mode or click the puzzle icon to enter the puzzle selection window (see below). The gravity and air pressure settings can only be adjusted in Free Form Mode.
Playing a puzzle
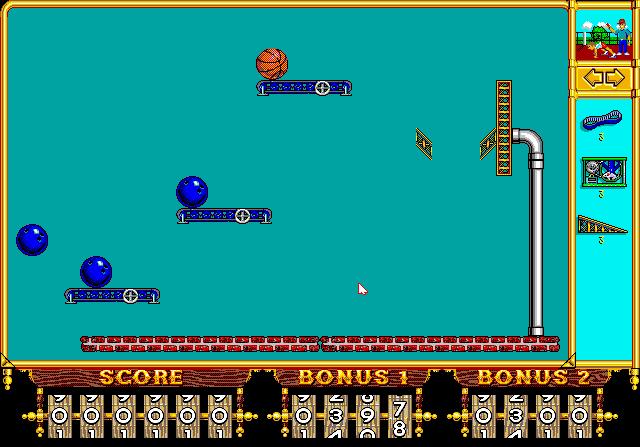
After clicking the large green arrow or the puzzle preview picture in the puzzle preview screen, the puzzle starts and timer starts running.
First you are in construction phase. You will use the machine parts from the parts bin on the right side of the screen, click them and place them in the main window and possibly adjust them before running the puzzle. Note that not all parts in the parts bin necessarily need to be used. You are free to use what you want, as long as the puzzle goal is achieved. In fact, in later levels there will be decoy parts in the parts bin, completely useless parts to deceive the player into thinking he needs them to solve the puzzle. The part bin can only show five different parts simultaneously. If more parts are available for the puzzle, use the the arrow keys above the parts bin to toggle through them.
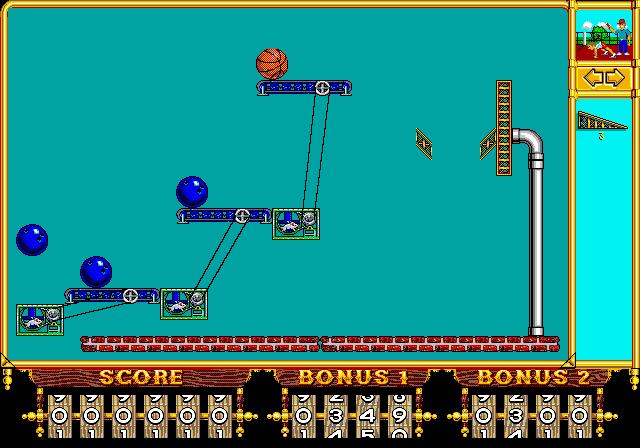
For example, our goal in this puzzle is to get the basketball into the basket. We have 3 belts, 3 mouse cages (which activate when hit by something) and 3 inclines available, along with the parts which are already on the screen and cannot be altered. Do the following:
- place a mouse cage underneath the bowling ball on the left, so that when the puzzle will run, the bowling ball will fall on it and activate the mouse cage.
- place a belt from that mouse cage to the lowest conveyor. As the mouse cage will be activated by the falling bowling ball, the running mouse will activate the lowest conveyor, which in turn will move the second bowling ball to the right until it falls of.
- place another mouse cage on the right side of the lowest conveyor. As the second bowling ball will fall off, we're doing the exact same thing as with the first bowling ball.
- connect the second mouse cage with the middle conveyor, using a second belt.
- do the same again, so that in the end the conveyor with the basketball is connected with the third belt and mouse cage. It should look something like this:
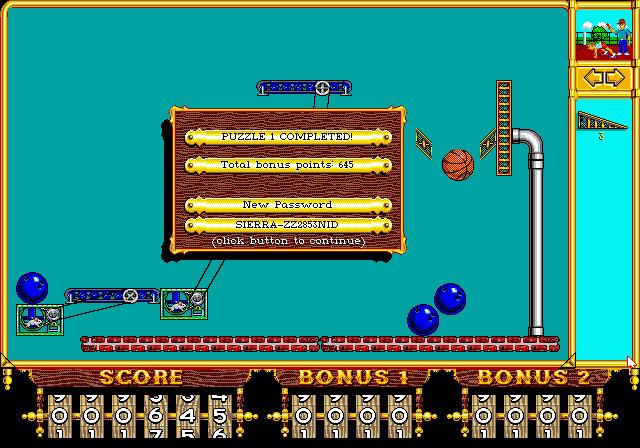
To stop the timer and run the puzzle, click on the runner in the upper-right corner of the screen. As you can see, the incline parts were not needed at all to solve this puzzle. If the puzzle goal however is not achieved, then left-click anywhere on the screen to stop the puzzle from running and return to the construction phase. When you do so, the timer will continue running as you improve the layout of the machine parts.
If the puzzle goal is achieved, a window will appear, listing your points and the password for the next level. The password is provided for later access. It is needed for each puzzle to jump levels to a red puzzle. After quitting the game, a password of the last puzzle solved will appear on the screen. Passwords have two parts - the first word is needed to return to a level. The cryptic stuff after the dash is for the score.
There are three different scores at the bottom of the screen. The left score is your total score. Every time you successfully complete a puzzle, the bonus 1 and bonus 2 points will be added to it, so the total score accumulates as you progress through the game. The bonus 1 points are awarded for speed - it ticks down like a timer as you construct the contraption. The bonus 2 points are awarded for difficulty. The harder the puzzle becomes, the more bonus 2 points you will receive. These you receive when you complete the level, regardless if you completed it within the given time frame.
Modifying machine parts
Machine parts can be modified to better suit your needs to reach the puzzle goals. If the basket in the previous example would be located on the left of the basketball, we would not be able to solve the puzzle if it weren't possible to turn around the mouse cage to reverse the direction of the conveyor. All machine parts can be flipped and some, such as conveyors, can even be resized. After placing a part on the screen, move your mouse cursor over it to see various icons. Click the straight arrows to lengthen a part (if available) or click the round arrows to flip a part. Clicking on the recycle bin will place the part back in the parts bin.
Power supplies
Some parts, such as the vacuum, require power, so you will have to place a power supply, such as a switch, on the play field. Place the vacuum next to the switch. If the vacuum has been plugged in, a plug will appear over one of the outlets attached to the switch. If a part has not been properly plugged in, the outlets will be empty and the part will not work when the machine is run. There are various types of power supplies in the game, all of which need some sort of activation before they supply power:
The generator turns rotational energy into electrical energy, so it needs to be connected to a mouse cage, monkey bike, etc. This guy puts out power for electrical parts. It comes with its own outlet.
The lightswitch provides power when the switch is turned on (the switch always starts in the OFF position regardless of which way it is flipped), so some object will have to go over the switch to activate it, such as a falling ball or a balloon rising past it.
The solar panels need a light source in order to provide electricity. This lightsource can either be a nearby flashlight or candle.
Machine parts that require electrical power are the electric engine (turning it into rotational energy), the fan (turning it into wind energy) and the vacuum (turning it into negative wind energy). Strangely the light bulb does not require an electrical power source.
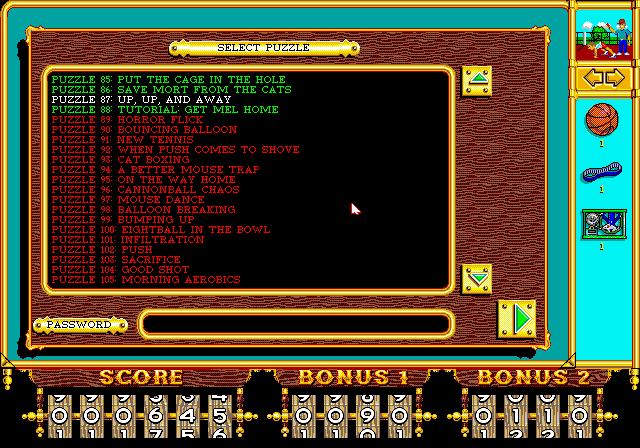
Puzzle Selection menu
In the puzzle preview screen, click the puzzle icon to access the puzzle selection screen.
Click the small green arrows to toggle through the puzzles, select a puzzle and click the large green arrow to access it. Green titles are available to play without entering a password. The white title is the puzzle which is currently selected. To play the red title puzzles, you need to enter a password which you obtain by playing through the earlier puzzles.